I’ll start with the good news: guitars are often easier to mix than every other instrument you’d find in a typical metal track. Most people overthink it.The bad news: 90% of the battle is starting with good tone right off the bat.
There’s a bright side to that, though. Even though it’s true that you can rarely take a poorly recorded tone or performance and fix it during the mixing stage (it might never happen), there are currently techniques and technology available that will help to prevent ever finding yourself in that situation.
Most modern studios rely on some combination of re-amping techniques and amp sim plugins to provide maximum tonal flexibility during the mixing stage. So before I start posting screenshots of parametric EQs, I think it’d be helpful to write a few words about that.
Re-Amping Vs. Amp Sims
I’m not going to get too deep into the actual recording process here (cabinets and miking deserve their own post), but I do want to impress one thing upon readers: if at all possible, always record the cleanest DI tracks you can for all of your guitar parts. Even if you’re miking a real amp and cabinet, split the signal, and record DI tracks simultaneously.
You might never need them; you might be happy with the guitar tone and continue to be happy with it right until the end. But sometimes a tone that sounds great one day can sound merely adequate the next—or worse. Ears get tired.
If you have DIs, you can always re-amp using a different miking technique, or even using a different head and cabinet. Or, you can skip the real amps entirely, and dive into the endless tonal possibilities offered by countless amp sims. Maximum flexibility.
Later in this article, I’m going to be mixing tracks that were recorded direct to my interface and then processed with Audio Assault’s inexpensive AHM 5050 plugin (am emulation of the EVH 5150 III).
Double-tracking, Triple-tracking, or Quad-tracking?
Should you double-track, with two primary guitars tracks panned hard-left and hard-right? Or should you quad-track, with two primarily guitars panned hard-left and hard-right, and two secondary guitars tracks panned similarly ?
The question shows up frequently on forums and Reddit, and the only honest answer is the unsatisfactory it depends. It depends on the genre, the ability of the player, and the guitar’s context within the mix.
Quad-tracking has the benefit of creating that wall-of-sound effect, but if the performance is sloppy, the clarity will suffer and you end up with diminished results. Yet double-tracking will sound weak if your reference album(s) happen to be quad-tracked.
Usually, I approach it this way: for black metal,I quad-track my rhythm guitars, unless I’m specifically going for a raw, stripped-down style. (Think early Mayhem or Darkthrone.) But the layered song-writing and harmonies in black metal often require it anyway (think Emperor), and fortunately the higher-tuned guitars help to prevent quad tracks from becoming unfocused and unclear.
Although I arrived a bit late to deathcore, and have less experience here, I do find that this genre can also benefit from quad-tracking, particularly the blackened-style that recently has exploded in popularity thanks to bands like Lorna Shore and Shadow of Intent.
For low-tuned, technical, brutal death metal and grindcore, which demands a tighter, more in-your-face approach, I most often triple-track. That’s two tracks of the same tone panned hard-left and hard-right, with a third track (dialed to a different tone) to “fill in” what’s missing from the primary rhythm tracks. This helps to shore up the tone while preventing your mix from becoming too diffused in the mid/high frequencies and too muddy in the low-end.
For example, in a reliable (although perhaps uninspired) tech-death mix, I might use the same 5150/Mesa V30 tone for the primary left and right tracks, and then choose another amp and cabinet/speaker for the centred track. Mixing Greenbacks with V30s, which are often a bit scooped in the mids, can help to restore some mid-range to your tone.
And in grindcore and powerviolence, a center track recorded with the infamous Boss HM-2 (or something similar) can bring some needed ugliness to your tone, even if it sounds kind of, well, awful when soloed.
Double-tracking is often sufficient for old-school death metal and thrash, but truth be told, if you’ve got the time, it never hurts to have an extra guitar DI or two to work with. You might not use it, but that’s a better situation to find yourself in than not having the option available, and wishing that you did.
The Primary Rythym Guitar
Note: for this post, I’ll be illustrating my process using Reaper, but the same principles work similarly in any DAW.
The basics: the two primary rhythm guitar tracks will be the backbone of your rhythm guitar sound. Each of these tracks should be a separate performance—simply duplicating a single performance will not do the job. Each track is then panned hard-left and hard-right, and sent to a guitar bus (or added to a grouping folder in Reaper) that I label Primary Guitars for processing (pictured below).
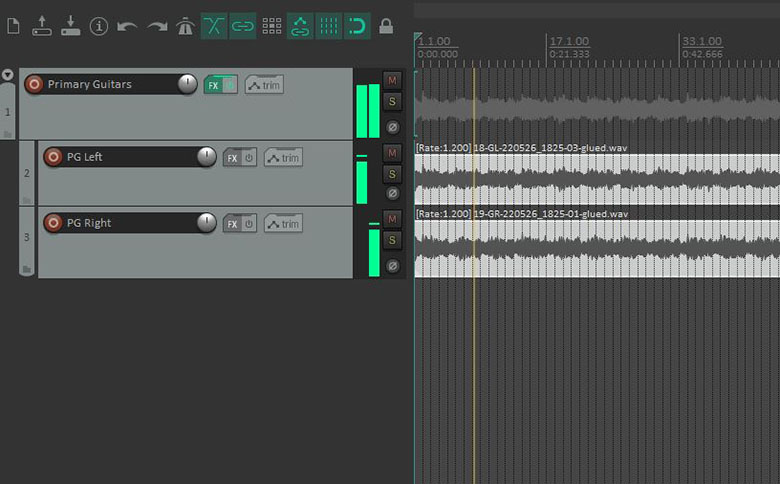
My two primary guitar tracks, panned hard-right and hard-left, placed in a folder named “Primary Guitars”
I far prefer that both right and left tracks share the same tone, or close to the same tone. This might not always be what a band will want—a band with two guitarists might want to record each track with a different rig—but I would advise against it, leaving the secondary tone for the third and fourth tracks (if you’re going the quad or triple-tracking route).
My signal chain on the the Primary Guitars bus/folder is usually very simple. If I’m using an amp sim to process two clean, panned DIs, I add that first. Here I’m using AHM 5050 by Audio Assault with a Mesa Boogie V30 cabinet IR from Ownhammer. I dial in the tone so that I get it as close as I can to my desired tone. Usually I set the bass knob around 6, the mid around 3 or 4, and the high around 6 as well. Depth and presence are set to taste, and I dial back the gain as far as I can before it loses too much bite and saturation. There’s not a lot times you’re going to want to crank the gain, and this applies to real, miked-up amps too.

My settings for the AHM 5050 amp sim. Note there’s nothing special about these settings: different guitars/pickups can drastically change the tone.
If the guitar tracks were miked and recorded from a live rig, I would of course skip this step completely.
The next plugin I add to the bus chain is a parametric EQ, preferably one that doesn’t restrict you to only a few bands. The current industry standard for this task is Fabfilter’s Pro Q3, (one of the few pricier plugins I do use), and I’ll be using that to illustrate.
I use this instance of the EQ to clean up any weird, annoying resonances or fizz from the guitar tone. Amp sims have come a long way, but even the best ones do sometimes introduce some artifacts that will benefit from being subdued. This can be true of real amps too—some of the unpleasant junk spit out by simulations of 5150s are also spit out by the actual amp.
Over time, I’ve found that the most egregious resonances show up regularly around two different points along the spectrum. First, there’s often an unpleasant resonance that inserts itself somewhere between 600khz and 700kh. Once I locate the exact location of this resonance, I typically reduce the band to a narrow Q (or bandwidth), targeting just that resonance, and cut it 3db to 6db.
The second problem area is a source of ugly fizz, and that usually occurs between 3.0khz and 3.6hz, although it can vary slightly. Cranking the mid, treble or presence knobs will add more of that fizz into your tone, and some modelled overdrive pedals will contribute to it as well. Again, I narrow the bandwidth (the Q) and reduce it 3db or so. However, in some cases I’ve needed to cut it by 12db! There’s no rule here.
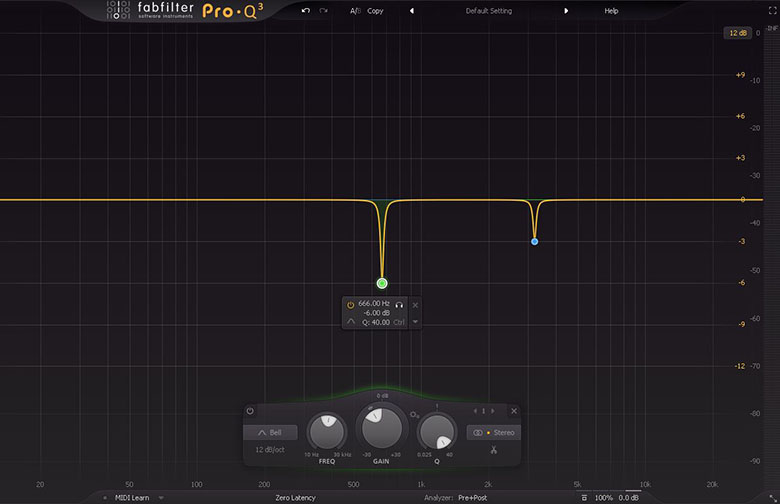
The adjustments I’ve made to reduce fizz and a annoying resonance. (Which was literally around 666.00hz in this case. How about that.)
But you shouldn’t need to make many more adjustments than this. A good technique to find unpleasant junk in the signal is to pull up a narrow band and drag it along the length of the frequency spectrum, listening through headphones for any problem areas. But bear in mind this takes some practice, and making too many cuts will suck the life out of your tone. Only tackle the really obvious sonic garbage that you can’t ignore.
Secondary Guitars
My setup for my third or fourth guitar tracks is identical to that of the Primary Guitars. The DI or the recorded rig is sent to a bus or folder that I label Secondary Guitars.

My third, centered guitar track, place in a folder called “Secondary Guitars”.
When quad-tracking, I usually pan the two secondary tracks hard-left and hard-right as well, although sometimes 80%-90% left and right works too.
If I’m only doing triple-tracking, I still send the lone track to the Secondary Guitars bus/folder (for the sake of sensible organization), but keep the panning centered.
I then add another amp sim to the Secondary Guitars bus/folder, if my tracks are clean DIs. Then another EQ to once again clean up any problem areas in the signal.
Note that this is where the flexibility of amp sims becomes most apparent. Ideally, your secondary guitars will offer up a slightly different tone that complements the primary guitars. One of the quickest and most effective ways to do this is to use a different IR. As mentioned earlier in this article, V30 speakers and greenbacks sometimes mix very nicely together. But the sky’s the limit.
For my example here, I’ve opted for a three track approach using Audio Assault’s Hellbeast amp sim (based on Randall’s Satan) with a EVH cab IR from York Audio. This amp sim offers a grindy mid-range that isn’t quite as disgusting as an HM-2 pedal, but adds some nice character to the mid-range.
Now it’s time to send both the Primary Guitars and Secondary Guitars to a bus (slash folder) that I label Guitar Bus.
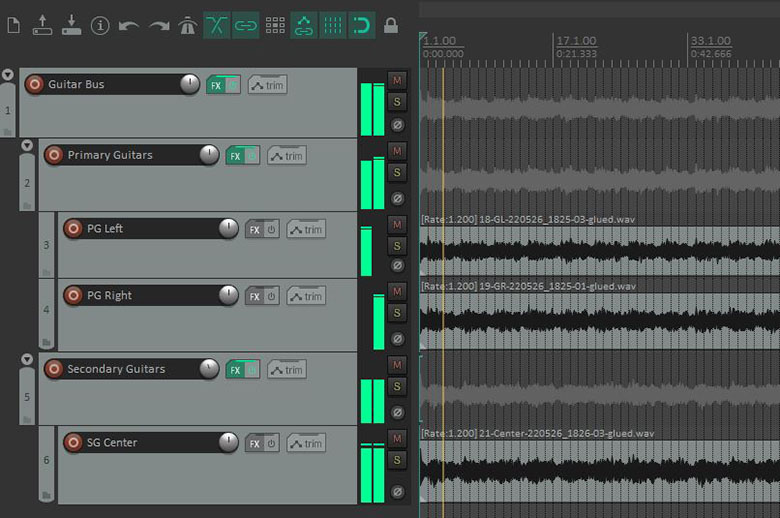
I place the Primary Guitars folder, two tracks it contains, and the Secondary Guitars folder with it’s single track in a top-level folder named “Guitar Bus”. Bus processing plugins are added to this folder.
The Guitar Bus
The signal chain on my Guitar Bus is a bit longer. It usually goes something like this:
- Saturation
- Emulated Analog EQ
- Parametric EQ (for high and low pass filtering, and additional tweaks)
- EQ to add air (and optionally do some sides processing)
- A multi-band compressor to tame booming palm mutes
Beginning with saturation: I usually opt for tape saturation, to add a bit of compression and analog warmth to the signal. My go-to plugin for this is Virtual Tape Machines from Slate Digital. I rarely tweak the default settings. Other popular alternatives for this are Black Box HM-2 or Soundtoy’s Decapitator. Too expensive for me.

The plugin I typically use to add tape saturation to my guitar bus, Slate Digital’s Virtual Tape Machines
For the Analog EQ, I usually go for a SSL-style solution. There’s an excellent model of this famous EQ available in Slate Digital’s Virtual Mix Rack plugin, which is my usual pick. It’s not my favourite: Solid State Logic’s official SSL Channel Strip 2 plugin sounds better, and Brainwork’s SSL 4000E plugin is great too; I’m just too cheap and poor to subscribe to all of them.
I don’t adjust the EQ too much using the SSL. It’s mainly on there to introduce some additional colouring. Typically, I brighten the signal by adding about 1-2db at 10khz, and lower the mids slightly around 500hz. But this has to be tackled on a case-by-case basis, appropriate to the tone you’re starting with.
Although both the tape saturation and character of the SSL EQ may seem extremely subtle on their own, it’s the cumulative effect we’re after.
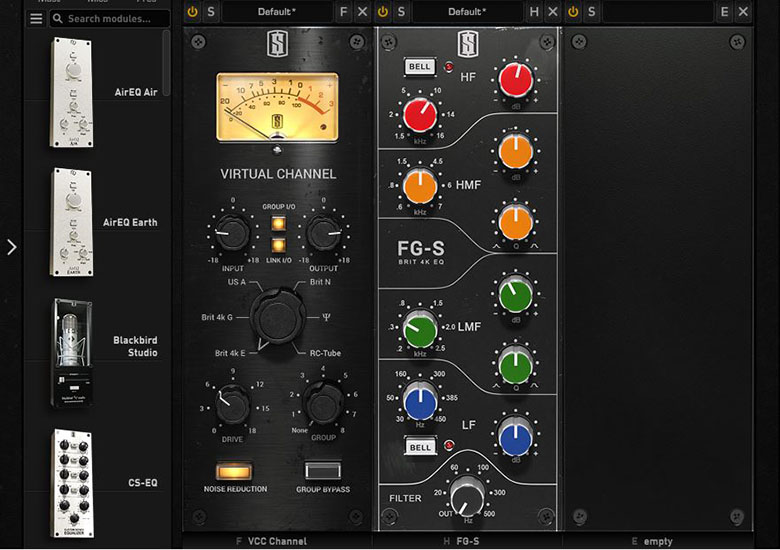
I use Virtual Mix Rack to add some analog character with an SSL-inspired EQ.
My first instance of parametric EQ (Fabfilter in this example), comes next. I high-pass the signal somewhere between 90hz to 120hz—it depends on the tuning. You’ll note that it strips some of the “heaviness” from your guitars when soloed, but the sub 100hz frequencies are ideally the domain of the bass guitar and kick drum.
I then add a low-pass filter somewhere between 8khz and 11khz. Again, this depends on the tone I’m starting with, and the goal I’m working toward. No set rules. Low-passing at 8khz might seem extreme, but sometimes the audio information above that frequency isn’t adding enough to the tone to make it worth keeping. It will vanish into the mix anyway, and removing it will leave more room for the cymbals and other high-frequency elements.
Sometimes in addition to the high and low pass filtering, I’ll take the opportunity here to tweak problem areas that may have arose when the tracks were bused. And sometimes I’ll slightly reduce the mids around 500hz at a Q of 1.0 by 1db or so to open up room for vocals. On occasion, I’ll also use this instance of ProQ to open up a little more room for the snare around it’s transient.

My first instance of parametric EQ, where I high-pass, low-pass, and make a few additional adjustments if necessary.
Next I add a second instance of parametric EQ (again, Fabfilter). I’ll be using this one to add air to the guitars, which is pretty straight-forward: I add high shelf at 10khz and raise it a few decibals. There are plugins specifically designed to add air to your mix; I do it this way simply as a matter of simplicity and familiarity.
If you have Fabfilter ProQ, sides processing is also a helpful trick to tighten up the low-end of your mix that I find particularly effective on low-tuned guitars that tend to edge into the bass’s territory.
In short, sides processing allows you to affect the right and left stereo “sides” of a signal while leaving the “mid” or center untouched. In this context, I would use Fabfilter’s Stereo Placement options (pictured below) to roll off all of the stereo information under 150hz or so. Essentially, you’re doing a high-pass on all stereo information below 150hz, leaving you with just the mono, or “mid” information.
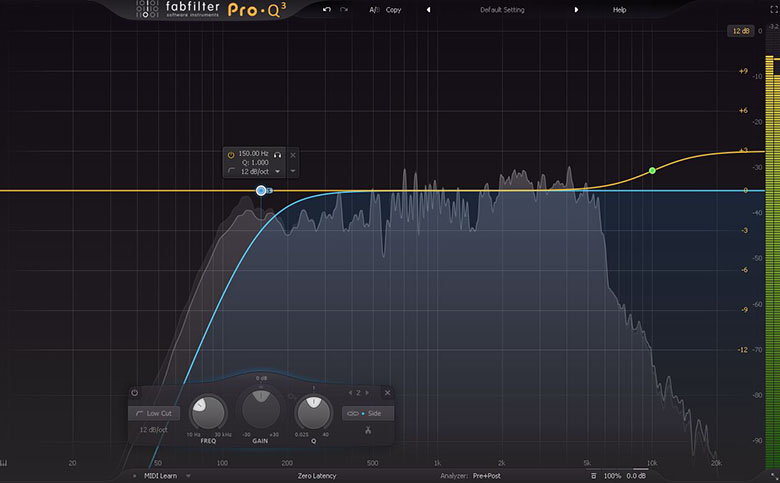
My second instance of EQ. The blue low-cut is only filtering out stereo information under 150hz and retaining the mid. The high-shelf adds a bit of air.
Next comes multi-band compression, the only type of compression I use on distorted, heavy guitars, which are already very compressed to begin with. But palm mutes do contribute to build-up in the low-end, and a bit of control goes a long way to achieving a balanced mix.
The range you’ll want to compress is going to depend on your tuning, and the guitarist’s performance. They way I usually approach it is to look at the spectrum, and identify where the palm mutes are peaking (on average). If they’re peaking at 200hz, would center the multi-band compressor’s band around here, and extend it to a range of about 100hz to 300hz.
I typically compress at a 4:1 ratio, and aim to reduce the gain until the peak is balanced with the rest of the spectrum. Usually by this point, I don’t need reduce much more the 2db in this frequency range. Be careful not to over compress. Don’t neuter the chugs!
There’s a few other optional tricks to tighten up the low-end–primarily side-chaining, which requires its own article. The idea is to trigger a fast compressor on the guitar bus whenever the kick strikes. Do it right and it adds some glue to your mix, but overdo it and you’ll end up with some unpleasant pumping.

Adding some multi-band compression with Fabfilter’s Pro-MB to tame the palm mutes.
A Final Note on Editing Guitars
Many engineers/producers will edit a guitarist’s performance during the mixing stage, if the performance is slightly pushing or dragging, to ensure that it’s “in the pocket”. I rarely do this. It’s not because I think it’s cheating—who cares. It’s that: 1) I don’t do this professionally, and I’m too lazy for such a tedious chore 2) I typically only record my own stuff, and have the time and patience to get my playing as exact as possible.
But this is common practice, especially in larger, more expensive projects headed by prominent metal producers. If you’re struggling with guitar tracks that are fitting in poorly within the mix, this could be the solution.
Summary
So that’s that: straight-forward processing that should allow your rhythm guitars to gel nicely with properly mixed bass guitar,vocal and drum tracks. Once again, it all depends to some extent on the rest of your mix–there’s no magic numbers and no rules, but if you’ve felt like your mixes have been missing something, hopefully you found info in this article that moved your goal a bit closer.
I’ll update this piece when I discover new techniques, and if anyone has any suggestions, or feels that I missed something essential, feel free to reach out and let me know.
