In the extreme metal genres, nothing can ruin an otherwise great song and recording faster than poorly programmed, fake-sounding drum tracks. In this article, I’m going to share some tips that will help you to create natural, convincing drum tracks.
For a long time, programming drums for high-speed, blast-beat laden genres like death metal and black metal wasn’t even option. In the 90s, more often than not—maybe even without exception—you could identify sampled drums on a recording within seconds.
Part of the problem was that many of the samples available before the time of VST plugins and multi-gigabyte add-on libraries were that most drum machines were ill-suited for the genre. And despite a handful of bands that made drum machines part of their signature sound (Mortician), it rarely worked (Mortician).
But now, all that has changed, and sometimes it’s impossible to tell whether you’re hearing a real drummer, or programmed tracks. In fact, real drums are sometimes so heavily edited, processed, and quantized that you might, at first listen, guess that an in-studio performance was programmed. The line has blurred significantly.
Anyway, before we head to the MIDI editor and start placing notes, there’s a couple other things worth mentioning.
Pick the Right Drum Samples and Software

The fact is, you could program the most nuanced, detailed drum tracks, fussing over each hit, painstakingly humanizing everything by hand, and if your samples and playback engine suck, the results will suck too.
So the first step in programming realistic drums for metal is choosing appropriate samples and software geared to mimic a real performance. This will typically be a VST instrument (EZDrummer, Superior Drummer, Kvlt Drums, Kontakt) that has humanization features built-in. I’m a huge fan of both free and cheap plugins, but quality drum samples are worth it.
And there are presently a lot high-quality drum libraries for metal. For some personal recommendations, be sure to check out my favourites: The Best Drum Samples and Software for Metal.
Your best bet is raw, dry, and multi-layered samples that have no additional (or minimal) processing. A bit of polish is fine, but if you trigger the snare and hear reverb before you’ve added reverb yourself, choose another sample.
Likewise, the “mix-ready” presets that are included with Toontrack libraries and other prominent libraries may be useful for songwriting and demoing, but I would advise against using them for a serious recording. Ideally, you’ll want to mix them manually in your DAW to ensure they fit well with and complement the rest of your mix.
For maximum realism you’ll also want to be able to trigger different hits at different velocities. Most if not all popular libraries are multi-layered. While kick drums don’t need to be particularly dynamic, a full-power snare hit within the context of a blast beat, for example, will usually sound fake. It’s just not how a real drummer would play it.
Finally, make sure to take advantage of the room mics included with most modern sample libraries, whether you prefer the upfront, tighter sound of the direct mics alone or not. Even when set comparatively low in the mix, the room mics add an organic quality that helps mitigate any potential “drum machine” cadence.
Familiarize Yourself with How Real Drummers Play

If you’re not already a drummer, the most thorough way to understand what metal drummers are doing is to learn to play metal drums.
Of course, that’s a dumb and impractical suggestion if you have no interest in learning to play drums or no money to buy a kit. So here’s a more practical option: start looking at drum tabs you find online. If you want to see what Spencer Prewitt from Archspire is doing, some of the tabs on Songster and UltimateGuitar include drum tab. Even if you can’t read music, you should be able to get the gist fairly quickly.
A common mistake beginners make when programming drums is putting together beats a real drummer couldn’t physically play. It’s important to recognize what’s possible and what isn’t. Few drummers with two limbs are able to hit the snare, two toms, a hihat, and two cymbals at the same time. In moderation you can get away with it—cymbal overdubs in the studio happen—but don’t overdo it.
It’s also a good idea to keep the drummer’s dominant hand in mind when programming your tracks. For example, when programming a roll, you don’t want to set every stroke at the same maxed out velocity, and you don’t necessarily want the velocity completely randomized, either. Give the strokes that would be played with the right hand a little more power by very slightly lowering the velocity on the strokes that would be played with the left hand. Modern drum libraries are detailed enough that it’s worth the effort.
I would recommend this approach for all drums and cymbals except the kick drum. Triggered kicks are so ubiquitous in extreme metal that unless I’m specifically going for an old-school or raw black metal sound, I almost always max out the velocity of the kick strokes and leave them there, then tweak the velocities of all other strokes with an actual performance in mind.
In The MIDI Editor
I’m going to focus on the classic blast beat, and will be using Reaper to illustrate. Any leading DAW will work, although some are have better humanization features than others. While Reaper and Studio One 5 have humanize options included in their MIDI editor, Cubase, for example, requires a script add-on.
Higher tempo beats are often more difficult to program convincingly than slower, traditional rock beats, and nothing is tougher to get right than the blast. It’s counter-intuitive, but a blast beat that sounds “weak” when the drum bus is soloed will almost always come across as “more real” in a full mix than a blast beat with maxed out velocities and machine-like power behind it.
Building the Basic Blast Beat
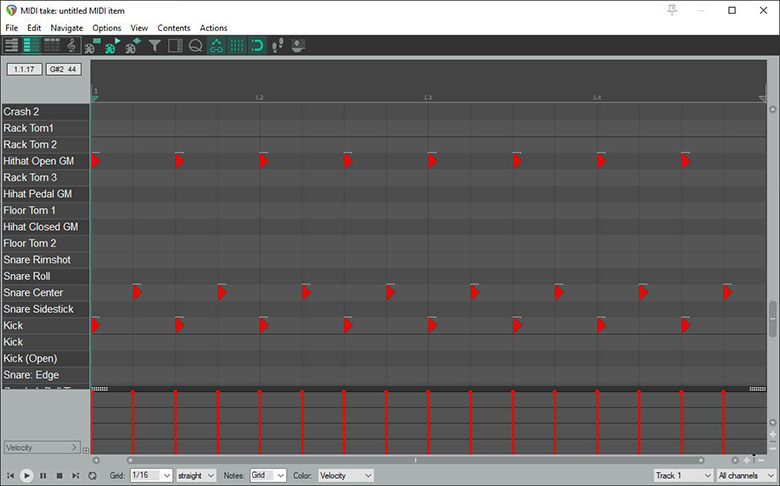
The basic blast beat without velocity adjustments or humanization.
With my project set to a tempo of 200bpm, I generally start out by building one measure of the basic blast. Here, the kick is comes first—a series of eighth notes on the upbeat. Then I place a series of eighth note snare strokes, relative to the kick, on the downbeat.
Next I place a series of eighth notes that will trigger an open hihat. In a traditional blast, the hihat will coincide with the kick on the upbeat. Alternatively you could use the ride, or another cymbal.
(Side note: Different drummers tend to favour different types of blasts, and it’s not uncommon to find the snare on the upbeat, played with the right hand. Generally this results in a stronger snare stroke and a more powerful blast. There’s no rule; it’s all about the effect you’re trying to achieve.)
Adjusting the Velocities (Power of the Stroke)
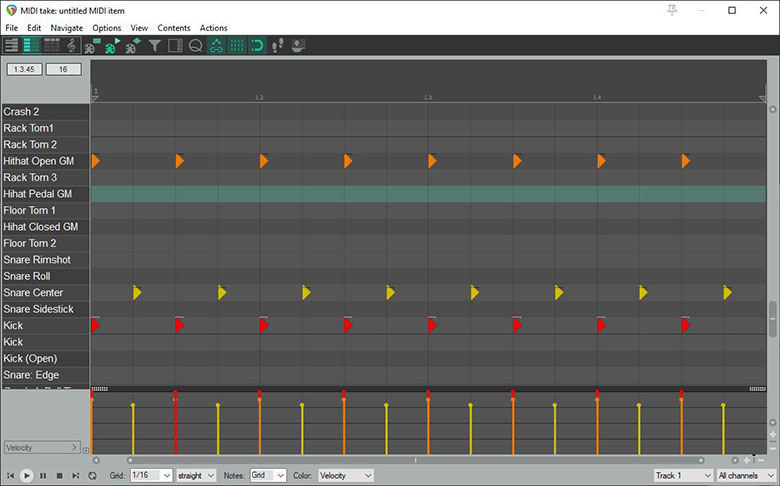
The basic beat with velocity adjustments. Kick at maximum (127), snare at 100, and hihat at 110.
Next, I adjust the velocities. I leave the kick maxed out (at 127 in Reaper, but some DAWs like Studio One use percentages…so 100%). We’ll apply some light humanizing later on, but a strong, consistent kick is generally what you want.
The snare velocity, however, needs to be adjusted.
When a real drummer plays a classic blast like this one, two factors will influence the power behind the snare strokes. The first, as I’ve already touched on, is the the drummer’s weaker hand. Assuming you’re trying simulate a right-handed drummer, the drummer would be using the their weaker hand for the snare, resulting in a less powerful stroke.
The second factor is that when playing a blast using the hihat, you end up crossing your hands, limiting the range of motion. Again, this limits the amount of force behind the snare stroke.
There’s another factor unrelated to real performances that should be taken into consideration, too, and that’s the samples you’re working with. Different libraries support a greater range of layers/velocities than others. For example, the Kvlt Drums library does not have as many velocity layers as a Toontrack library. Always make sure that the velocity you choose actually triggers the kind of stroke you’re aiming for, you have to tailor it to the sample library you’ve got.
I’m using Toontrack’s Modern Metal library, and so I select all eight snare strokes and bring their velocity down to 100 (or roughly 80% in Studio One). Then I select all eight hihat hits, and because I know that the hihat has the benefit of the dominate hand, and a less restricted range of motion, I set it to a slightly higher velocity at 110 (or 90% in Studio One).
Extending the Length
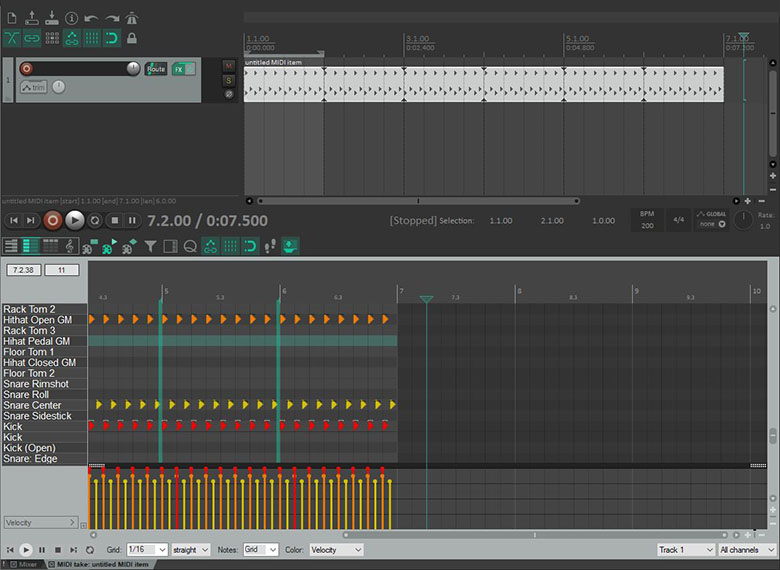
The single-measure loop extended to six measures in Reaper
Next I want to duplicate the measure to lengthen the part. In Reaper, this is a breeze. In the arrangement view, you simply click & drag the end of the part out to the desired length (let’s say six measures). Then you select the resulting extended loop and glue it together to make it all one, non-looping part (Right Click > Glue Items).
In a DAW like Studio One, to get six measures, you would use the duplicate function to duplicate the part six times. Then, you would select all six parts and, like Reaper, glue them together as one part.
Why not just loop the single measure and leave it at that? It’s because once we start applying additional humanization, shorter parts can reveal their looped nature by noticeably repeating nuances and variations that shouldn’t noticeably repeat.
Humanize It
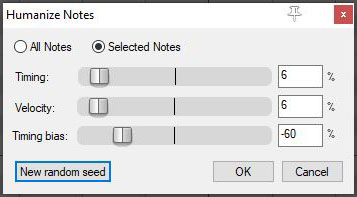
The Humanize Options in the Reaper MIDI Editor
Now that I have six measures of my blast, I do some additional humanization. Fortunately, most DAWs make this easy. Both Studio One and Reaper have a “humanize” options built-in to their MIDI editors. Cubase has custom scripts you can find online.
The humanize features focus on two elements: velocity and timing.
How much you humanize your drum part depends on your genre and what kind of drummer you’re trying to emulate. You might apply it more liberally for raw black metal or grindcore, which benefits from less precision, and perhaps very conservatively for technical death metal and deathcore. Be careful, though: you can easily overdo it. The humanize functions in both Reaper and Studio One use range percentages, and I’ve found that any humanization above 8% (for either velocity or timing) is often too much.
To apply the humanization, I select every note across all six measures, then choose “Humanize” from the drop down in the MIDI editor. I then set the velocity range to around 6%, meaning that the velocities will be randomized within a fairly narrow range—you’re not going to end up with one snare stroke at a velocity of 120, and another at 35.
Likewise, I set the timing range around 6%. This means that instead of being locked to the grid, every note is going to be slightly pushed or pulled forward and backward.
Both Reaper and Studio One allow you to set a timing bias as well, which can be used to tell the algorithm to “rush” the beat more frequently than it will “drag” the beat. In Reaper, I set my Timing Bias to -60%, which means that 60% of the timing adjustments will result in notes being rushed. This is more consistent with the way metal drummers play, particularly at high tempos.
Once you’ve applied the humanization, you should be able to play back all six measures without any hint that it was initially a single measure loop. If there are any weird parts that stand out, make sure to manually fix them.
Adding Variation and Nuances
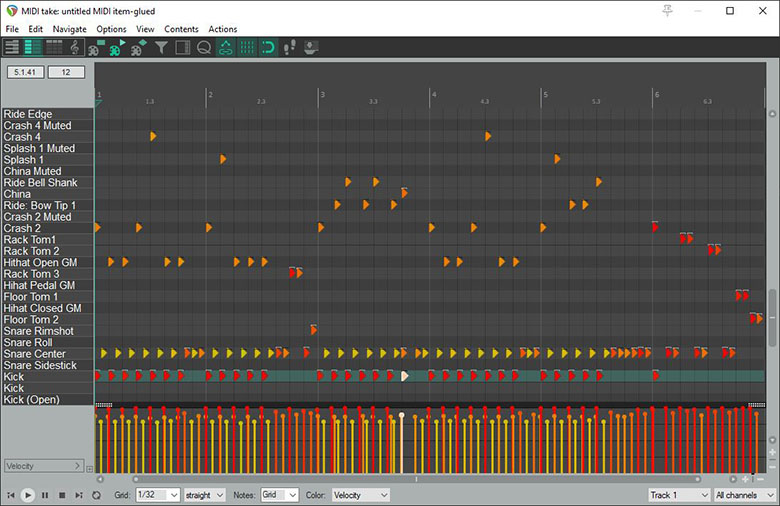
The full six measures with humanization and variations.
After this, the next task is to add in variations, for both realism, and to make the part more interesting. And any time you add something new—a short snare roll, for example—you can select the newly place notes and humanize them the same way you humanized the entire section.
Below you can hear six measures of the basic blast without any humanization or variations:
The same six measures with humanization tweaks and variations (hastily assembled, but you get the point):
Most drummers aren’t going to blast for long without mixing it up a bit. Cymbals will be used to accent and complement guitar parts, and flourishes and fills will break up the monotony of lengthy blast. How much variation you add to your drum tracks is up to you—no rules!—but it is a good idea to keep it consistent throughout the entire track, the same way a drummer with their own individual style and technique might.
Some Thoughts on Programming Fills
The best advice I can give for programming drum fills is to keep it relatively simple. Outside of drum solos, most drummers aren’t peppering their band’s songs with complex, virtuoso fills. Straight-forward rolls and other rudiments get the job done.
For inspiration, I again recommend checking out some drum tab online. Unlike guitar riffs, most drum fills aren’t distinctive enough to trace to their origin. Many of the same patterns and arrangements show up again and again. Granted, if you open your track with an exact recreation of the drum intro to Slayer’s Epidemic, someone’s probably going to notice. But if you dropped the same part into the middle of song that’s 75% the tempo, in a completely different context, it’s unlikely most listeners would instantly identify it.

The opening drum fill of Slayer’s Epidemic, programmed by hand using drum tab for reference.
Again, the key to programming convincing fills is keeping real performances and the way drummers play in mind. Don’t program anything that is physically impossible to play, unless that’s the point.
If you’re programming a simple snare or tom roll, take note of which hand would play which stroke. A snare roll might open with a strong stroke from the right hand, and the next note would be ever so slightly weaker, played with the left hand, and so on.
The opening of Epidemic, programmed by hand & using EZDrummer’s Metal Machine sample add-on:
Consistency is also important unless you’re aiming for a particularly effect. A hard-hitting drummer generally doesn’t lighten up halfway through a song. Don’t program half your fills at near max velocity and the rest at only 75% of max. That might seem self-evident, but sometimes, depending on the DAW, it’s just a matter of not noticing you’ve been inserting notes at lower velocities.
When humanizing, definitely bias the timing toward rushing the beat. Rushing tends to happen more frequently in fills, and they rarely drag, except maybe in instances where they lead into a slower part of the song.
Summary
If you’ve been struggling to program realistic metal drums, hopefully you’ve found something useful in this article to help you along. In the future, I’m going to release a collection of basic MIDI beats programmed using the techniques I’ve outlined that you can drag and drop into your own projects as a starting point.
I’ll keep this updated as I learn new things myself. If you have any suggestions or criticism, feel free to reach out and let me know.
